There are 2 ways a vehicle can be destroyed, wrecked and explodes. Each of these has its own set of rules and its own set of mistakes.
So let us look at a few examples of each type of destroyed result and see what the rules would suggest should happen.
Wrecked
The rules state(p.67) that passengers must immediately disembark, and take a pinning test. Any models that cannot disembark are destroyed. Then the Vehicle becomes a wreck.
Example 1:
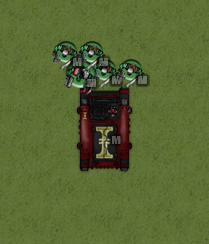

Which would use the space shown here. If any models cannot fit then they are destroyed.
Next let us look at the next common assault situation. A case where all the doors of the vehicle are blocked

In this case the passengers can still disembark, but must do so using the rules for emergency disembarking. Which means that they can exit the vehicle within 2" of any part of the hull, but cannot do anything for the rest of the turn. However, they still must remain 1" away from the orks. Meaning if there are say 10 guys in that Rhino some are likely dead as they will run out of space in which to disembark.

Next, lets look at what happens if you are surrounded when your vehicle gets Wrecked.

I have seen people try to argue that you can still emergency disembark in this case as a wrecked vehicle counts as terrain. This is incorrect however, as if you look in the rulebook on P.67 you will notice that it says that the passengers disembark and then the vehicle becomes a wreck. This is important because when the disembarking is taking place the vehicle is still a vehicle, and therefore cannot be moved through, or on, therefore the unit inside is destroyed.
Finally: what happens when the vehicle explodes? This to me is the most difficult piece, the rulebook (p.67) states that all of the embarked models take a strength 4 hit and the survivors are placed where the vehicle used to be. Easy enough, however, what happens when the vehicle is surrounded? Do you still have to be 1" away from the enemy models? The rulebook is unclear on this, as is the GW FAQ. Looking at other sources the INAT FAQ rules that the models within 1" of enemies are removed as casualties, this seems to be supported by the movement rule that you are not allowed to move within 1" of an enemy unit unless you are assaulting(p.11), however, does placing the unit where the vehicle was count as movement, or does it break this rule? If as I suspect it does not then surrounding a Rhino and exploding it only leaves space for 2 or 3 marines where the vehicle used to be.

