Tuesday, April 12, 2011

Transports and Assault.

One place I see a lot of people make errors in the game is when their transport vehicle gets destroyed in close combat.  Sometimes this is because the rules are not incredible clear, sometimes it is just wishful thinking on the part of the player.
There are 2 ways a vehicle can be destroyed, wrecked and explodes.  Each of these has its own set of rules and its own set of mistakes.

So let us look at a few examples of each type of destroyed result and see what the rules would suggest should happen.

Wrecked
The rules state(p.67) that passengers must immediately disembark, and take a pinning test.  Any models that cannot disembark are destroyed.  Then the Vehicle becomes a wreck.

Example 1:
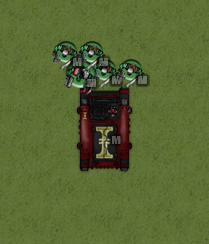

In this picture the Orks have assaulted the front of a Rhino, and wrecked said Rhino.  Therefore the passengers must disembark from the Rhino, following the rules for disembarking(p.67), which include staying 1" away from the Orks.

Which would use the space shown here.  If any models cannot fit then they are destroyed.
  Next let us look at the next common assault situation.  A case where all the doors of the vehicle are blocked

In this case the passengers can still disembark, but must do so using the rules for emergency disembarking.  Which means that they can exit the vehicle within 2" of any part of the hull, but cannot do anything for the rest of the turn.  However, they still must remain 1" away from the orks.  Meaning if there are say 10 guys in that Rhino some are likely dead as they will run out of space in which to disembark.
Next, lets look at what happens if you are surrounded when your vehicle gets Wrecked.
I have seen people try to argue that you can still emergency disembark in this case as a wrecked vehicle  counts as terrain.  This is incorrect however, as if you look in the rulebook on P.67  you will notice that it says that the passengers disembark and then the vehicle becomes a wreck.  This is important because when the disembarking is taking place the vehicle is still a vehicle, and therefore cannot be moved through, or on, therefore the unit inside is destroyed.

Finally: what happens when the vehicle explodes?  This to me is the most difficult piece, the rulebook (p.67) states that all of the embarked models take a strength 4 hit and the survivors are placed where the vehicle used to be.  Easy enough, however, what happens when the vehicle is surrounded?  Do you still have to be 1" away from the enemy models? The rulebook is unclear on this, as is the GW FAQ.  Looking at other sources the INAT FAQ rules that the models within 1" of enemies are removed as casualties, this seems to be supported by the movement rule that you are not allowed to move within 1" of an enemy unit unless you are assaulting(p.11), however, does placing the unit where the vehicle was count as movement, or does it break this rule?  If as I suspect it does not then surrounding a Rhino and exploding it only leaves space for 2 or 3 marines where the vehicle used to be.


 

Friday, April 1, 2011

Final moves 2: Answer


So on the bottom of 5, the best thing you can do (in my opinion) is
1.) Use Where did he go on deathleaper so that he can contest turn 6 if needed
2.) Cast dominion with the left-hand tervigon so you have control over the hive guard in the ruins.
3.) Spawn Gaunts with the rightmost tervigon.  The circle in the picture is the 6 inch spawn range.
4.) Those gaunts then move 6" toward the enemy objective.
5.) The tervigon and gaunts on the right advance, the tervigon should cast feel no pain on itself, and position itself to charge the closest predator.
6.)Have the Hive guard in the ruins shoot the flamer RB, which will hopefully stop it.
7.) Run the newly spawned gaunts to contest.
8.) Charge the predator with the tervigon.

Those are the best moves that you can make (IMO).  While you may have other moves to make  most are subject to chance (rolling LD for instinctive behavior, Difficult terrain, etc.)

If you pass all of those checks I would do the following differently
1.)right most Trygon would move to try and take out Flamer RB (he should be able to get there with Fleet and Move through terrain, though it is not a give)
2.) Hive Guard in Ruin would try to move to the right to shoot at Baal Pred.
3.) Other Hive guard would shoot at closest RB (they can do this either way, and it helps but is not essential to winning on turn 5 or 6)
4.) Other Trygon would assault the RB closest to him.

Wednesday, March 30, 2011

Rules "you" get wrong: Feel No Pain

So while playing the game and visiting forums I frequently see people misinterpret various rules (at least to my knowledge).  the most common of these (online at least) is the rule for Feel No Pain.  The argument I usually see goes something like this:

"If the AP of my weapon ignores your armor save you don't get FNP."

First let me provide an example of why this is completely ridiculous.  Ladies and gentlemen I present, the lowly Plague bearer  

Here is a model with the fell no pain rule...and no armor save.  As silly as GW can be sometimes I don't think that they would be so obtuse as to create a model with a rule it was completely unable to use.  Daemons is hardly even an outdated book, (it came out just prior to 5E so GW must have known how their own rules would work).


So lets look further at the FNP rule.

Feel No Pain

"If a model with this ability suffers and unsaved wound, roll a dice.  On a 1 ,2, or 3 the model takes a wound, on a 4, 5, or 6 the injury is ignored.  This ability cannot be used against wounds from weapons that inflict instant death.  Neither can it be used against wounds from Ap 1 or Ap 2 weapons, power weapons, and any other wound against which no armor save can ever be taken.  (Power fists, Dread close combat weapons, rending, perils of the warp, dangerous terrain.)"

Breaking down the rule we get

If a model with this ability suffers and unsaved wound

The term unsaved wound is important, this could be part of the contention, but it is usually not, brought up. In general any wound that is not saved (including those against which you don't get a save) would be considered unsaved. This appears to be how the INAT FAQ interprets this rule Though there is no specific reference to this in the rules. In fact the only reference at all is in the allocating wounds box at the bottom of the page 25, where it state that the unit has suffered 2 unsaved wounds and one wound with no armor save from a melta gun. I can see an argument being made off of this that unless you take a save of some kind (including invulnerable) you don't get feel no pain. However, I believe that the assault results section of the book (p.39) supports the idea that any wound that ignores armor saves counts as unsaved (otherwise power weapon wounds don't count toward combat resolution as it only mentions unsaved wounds)
This ability cannot be used against wounds from weapons that inflict instant death. 

This section of the rule is fairly clear cut and subject of little argument.  If something causes instant death (either double toughness or special rule), then no Feel No Pain.

Neither can it be used against wounds from Ap 1 or Ap 2 weapons, power weapons, and any other wound against which no armor save can ever be taken.

Now we get to the most debated part of the rule,  especiall the part in bold.  Everyone understands the first part of this statement, no Feel No Pain against AP 1 or 2 or power weapons, pretty straight forward.  The part that many people get wrong is the bolded statement,  "no armor save can ever be taken."  The misreading of this rule is that it means if you don't get to roll an armor save you don't get feel no pain.  In other words if the AP of my weapon defeats your armor save, it also bypasses feel no pain.  This is incorrect reading: no armor save is not the same as your models armor save.  No armor save means that there does not exist an armor save which may be taken against said wound, or that the wound bypasses all armor saves in the game.  Your models armor save is the specific save of the model in question.  A more clear wording of this statement would be a wound against which a 2+ armor save cannot be taken against.

Again consider the plague bearer, if no armor save = your models armor save, then plague bearers (who have no armor save) can never use their feel no pain special rule.

Monday, March 28, 2011

TL AC Dreads


Headed For the NOVA Open.

Over this past weekend I finally figured out the logistics of heading down to VA and participating in the NOVA Open (and purchased my ticket).  This will be my second NOVA style event (I attended the Battle for Salvation GT last October) and by far the largest tourney I have participated in.  All that is left for me to do is determine which of my armies to bring.  I have my Deathwing, who are in the process of being repainted (as my first army the paint job left a little to be desired even for me.), and rearmed post FAQ.  I also have a work in progress Tyranid army, I have been playing around with ideas for.  Finally I have the army that has been my most recent tournament army, which is a Codex Marine biker army.  So on the run up to the NOVA, I’ll try posting up my lists, what my thoughts were behind making them, and what my findings are in play testing.  As we get closer to the tourney, I see what people out there think I should take and probably bring that with me as the list I will run.  So feel free to give any feed back or ask any questions you like about the lists, as I post them.

Know your enemy: Tyranid Hive Guard


One of the units that always gets mentioned when people talk about what is good in the Tyranid codex is the Hive Guard.  This is Mostly because they are a good unit.  They are one of the better shooting units in the codex, and one of the few reliable anti tank unit the Tyranids have.

Strengths
1.)    Durability:  These guys are high toughness (6) with 2 wounds, and a decent (4+) save.  These guys can also hide, making them more durable to shooting.
2.)    Anti-vehicle Shooting:  They have a high strength weapon (S 8) with a decent rate of fire (2 shots each).  In addition they do not need LOS to shoot at a target.  They are also BS 4 so they are fairly accurate.

Weaknesses:
1.)    Range of 24” means these guys have to move quite far to be truly effective.
2.)    Anti-infantry shooting:  While they can kill infantry, they have only a So-So AP (4 is not much better than 5), and with only 2 shots each at most a squad of these guys will kill 6 models.
3.)    Close combat: While Tough these guys have no armor save ignoring attacks, poor initiative (2) and few attacks.
4.)    Synapse: This is a weakness for most tyranids, while these guys have a decent LD score, you don’t want to rely on them if they are out of synapse.
5.)    Mobility: They can only move 6” during movement, (+ run if need be).

The biggest issue I find with these guys is the synapse rule.  This means that I cannot always deploy the Hive Guard where I would like to optimally because risking them not doing what I want them to his huge.  This means that if your whole army is pushing forward the hive guard really need to go with them.  While this is not entirely a bad thing, for me it seems to slow the army down if everything else wants to run, the hive guard either need to run (which means they are not shooting.) or chance falling behind.

Monday, March 21, 2011

Final moves 2

So here is the set up

It is the bottom turn 5 Mission is capture and control.

You are playing Tyranids and going second.
You have left:
2 Wounded Trygons (both have 3 wounds left)
2 Units of 3 Hive guard
2 Tervigons  (the one in the lower right has 4 wounds left but can no longer make gaunts, the one on the left his 3 wounds left, both are troops)
23 Gaunts as shown
Deathleaper in the upper right.

Your opponent
playing blood angels has
Mephiston in the center of the board.
3 Auto Las predators
3 Las plas razorbacks (with 5 man assault squads melta guns, fist Sargent)
2x5 man assault squads (with meltaguns, fist sarge) as shown
A Heavy flamer Razorback on the right (with 5 man assault squad melta gun, fist Sargent)
A flamestorm Baal pred all the way on the right.


So the question is what move gives you the best chance to win the game while still setting you up to win if the game goes on?